News Releases
Review our guide and videos below on how to add releases to your website.
Adding a Release For a Specific Sport
Sign into your site and click into the Game day tab
Click on the appropriate season in the right-side panel. If you want to edit an out of season sport, click the "View All Seasons" bar at the top.
Click into the Releases tab
Click the [add release] link in the upper right corner

The Date will default to today's date, but can be changed if need be. Please follow the mm/dd/yyyy format
You can set this release to publish to an event as well as a headlines:
Click the "Publish to an event" button and select the event you would like to publish this release to. You can publish the release to multiple events by clicking Publish to an event again. You can choose which type of release this is from the "Link" drop-down, such as a game preview or recap. This will connect the release as a link based on the type of link you select from that dropdown menu.
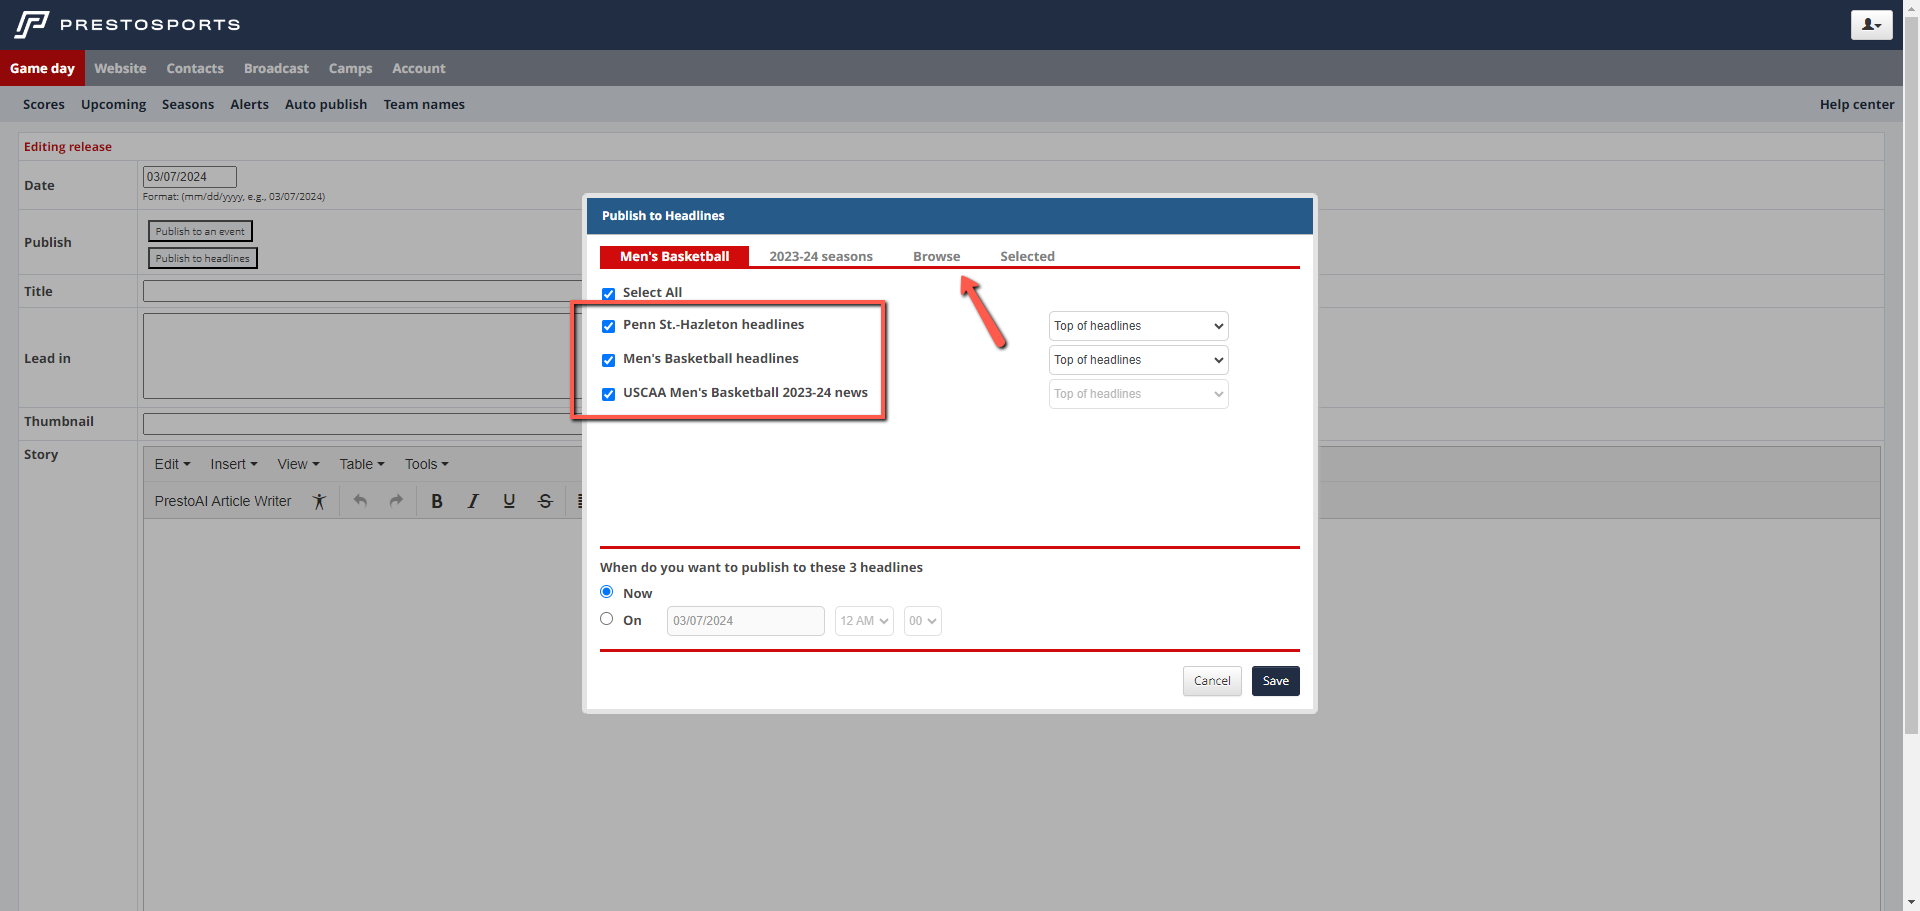
Click the "Publish to headlines" button and select which headline(s) you would like to feature this release to. By default it will feature the release to these three headlines areas:
School name headlines- This is the News Rotator on the website homepage
Sport headlines- This is the News Rotator on the sports homepage (Ex. Men’s Basketball headlines)
Season name news- This is the news page for the sport season where you are creating the release (Ex. USCAA Men’s Basketball 2023-24 news)
You can click on the browse tab to select other headlines that you want to feature it to. If your headlines is set to manual sort you can choose the order you want this release to appear from the drop-down. You can also set the release to be published now or at a specific date/time by clicking on the Now or On radio buttons at the bottom of the window. The date/time selected with the On radio button is based on the time zone of the user creating the release, not the website time zone, so you will need to take that into account when scheduling the publish date/time for that release.
Add the Title for the release
Add the lead-in. This can be the first couple sentences from your release. The lead-in will show in your story rotators and more headlines areas on your site.
Add the thumbnail of your story. This is the image that will appear in the News Rotator and the body of your release.
By clicking on the [...] button you can browse your site for images already on your site or can upload an image from your computer. These images need to be sized to 1920 px by 1080 px.
Add the body of the release in the "Story" text space.
Use the tool bar to add formatting and insert images and videos within your release.
Click Save to create the release.
Adding a General Release
General Releases are used for releases that cover multiple sports or are department-wide. The process for creating one is similar to a sport specific release with some slight variations. You will need to setup the General Releases season first before you can create releases by following these instructions.
Sign into your site and click into the Game day tab
Click on the appropriate General Releases season in the right-side panel. If you want to edit an out of season release in General Releases, click the "View All Seasons" bar at the top and then select General under the Navigate to a season by sport column.
Click into the Releases tab
Click the [add release] link in the upper right corner

The Date will default to today's date, but can be changed if need be. Please follow the mm/dd/yyyy format
General Releases can’t be used to publish a release to an event since they aren’t connected to a sports season. You can only publish it to headlines:
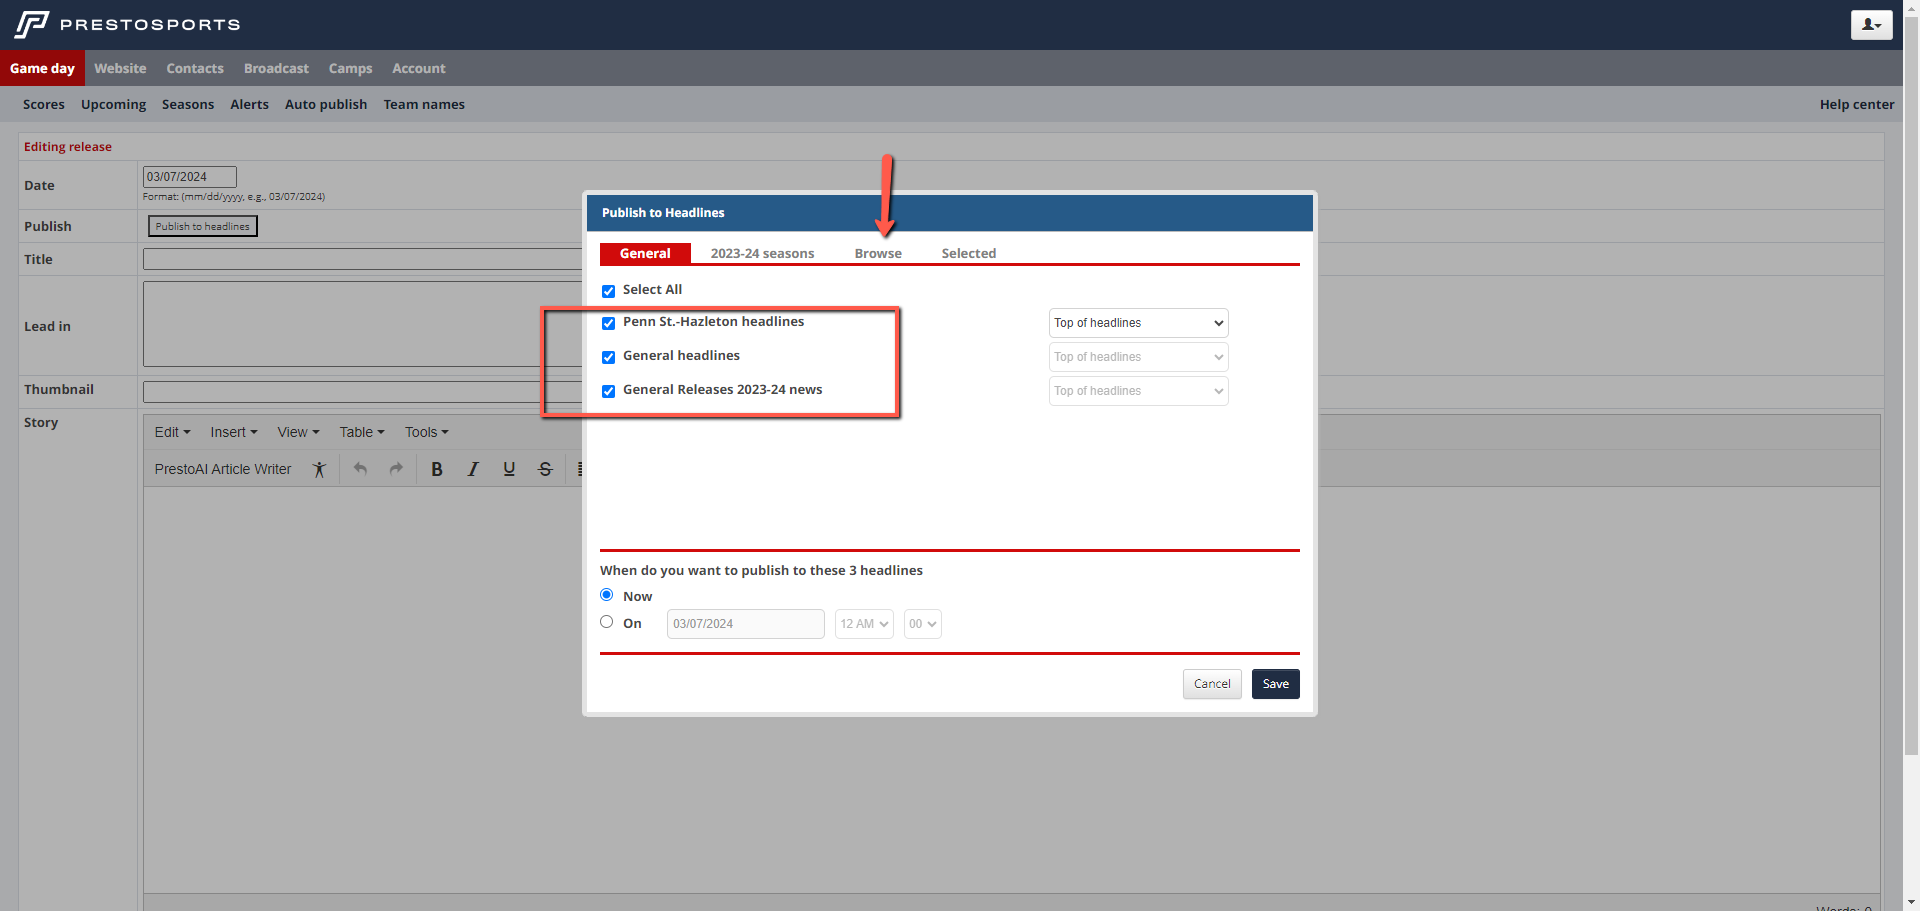
Click the "Publish to headlines" button and select which headline(s) you would like to feature this release to. By default it will feature the release to these three headlines areas:
School name headlines- This is the News Rotator on the website homepage
General headlines- This is the News Rotator created within the general section on the website
Season Name General Releases news- This is the news page General Releases for the season where you are creating the release (Ex. General Releases 2023-24 news)
You can click on the browse tab to select other headlines that you want to feature it to. If your headlines is set to manual sort you can choose the order you want this release to appear from the drop-down. You can also set the release to be published now or at a specific date/time by clicking on the Now or On radio buttons at the bottom of the window. The date/time selected with the On radio button is based on the time zone of the user creating the release, not the website time zone, so you will need to take that into account when scheduling the publish date/time for that release.
Add the Title for the release
Add the lead-in. This can be the first couple sentences from your release. The lead-in will show in your story rotators and more headlines areas on your site.
Add the thumbnail of your story. This is the image that will appear in the News Rotator and the body of your release.
By clicking on the [...] button you can browse your site for images already on your site or can upload an image from your computer. These images need to be sized to 1920 px by 1080 px.
Add the body of the release in the "Story" text space.
Use the tool bar to add formatting and insert images and videos within your release.
Click Save to create the release.
Video instructions:
Embed an Image
To embed an image into a release, use the "Insert/edit image" button from the tool bar:
Place your cursor in the area you would like to embed the image.
Click on the "Insert/edit image" icon

Browse your site or upload images by clicking on the search icon to the right of the "Source" field.
Once you find the image, click the image and then click the "Ok" button.
You have the option to change the following properties before inserting the image:
Add Alternate (alt) text
Change the image dimensions- this will only adjust the dimensions for the image on the release. It won’t affect the dimensions of the image anywhere else it is used on the website.
Add a border (enter the number of pixels wide you want the border to be. We suggest "1")
Add vertical space (enter the number of pixels you want the padding above/below the image to be. We suggest "5")
Add horizontal space (enter the number of pixels you want the padding to the right/left of the image to be. We suggest "5")
Click "Insert"
Embed a Video
To embed a video in to a release, use the "Insert/edit embedded media" tool from the tool bar:
Place your cursor in the area you would like to embed the video
Click on the "Insert/edit embedded media" icon

Browse your site for a video file by clicking on the search icon to the right of the "Source" field. You can also use the Embed tab to paste embed code from a third party site, such as YouTube.
Change height and width if needed. Be sure to check "Constrain proportions" so your video does not get stretched.
Click "Insert"
